This is default featured slide 1 title

Go to Blogger edit html and find these sentences.Now replace these sentences with your own descriptions.

This is default featured slide 2 title

Go to Blogger edit html and find these sentences.Now replace these sentences with your own descriptions.

This is default featured slide 3 title

Go to Blogger edit html and find these sentences.Now replace these sentences with your own descriptions.

This is default featured slide 4 title

Go to Blogger edit html and find these sentences.Now replace these sentences with your own descriptions.

This is default featured slide 5 title

Go to Blogger edit html and find these sentences.Now replace these sentences with your own descriptions.

Wednesday, December 24, 2014

How to check your Flash Disk is Original or Fake


         Nowadays we can buy Flash drive at low price. We can buy 32GB flash drive for only 10 $. Mostly these are fake drives. Now flash drives also manufactured as fake and its it's look like original one.  These type flash drives are mostly imported from China. They are using some small programs to show 4GB pen drive as 32GB.


How to check your Pen-Drive is Original or Fake


So let's check your Pen-drive is original or fake

H2Testw software is one of the best software to check Pen-drive is original or not. Also you can check your Memory Card with this software.

  click to download H2Testw

Empty the files on pen drive before checking
Click on Target DeviceNow select your Removable device
Then Click Write+Verify button.
If your pen drive is original, a message will appear as "Test finished without errors

FLASHING HUAWEI E303 Hi Link ( KISWAHILI )

Hi Link modems  ukishaiplug in tu inaconnect internet unless umeiset kuiconnect manually. Hazitumii normal Huawei dashboard zinatumia their own “Web UI” hivyo haziwezi kuwa detected kwenye normal dashboard za Huawei. Na hata ukiiconnect kwenye PC, jamaa wanakuwa wamedisable PORT na hutaweza kuiona ktk device manager under Ports, Modems or Network adapter, so ukisema uiunlock kwa kutumia Flashing method kama za E303 za kawaida hautafanikiwa.

NJIA YENYEWE
Vodacom Huawei E303 Hi link modem ni customized Firmware so njia pekee ya kuiunlock ni kwa ku flash.

REQUIREMENTS
Maelezo ninayotoa ni kwa ajili ya PC tu, na vitu vinavyoihitajika ni
  • Huawei Mobile Partner (Version ya hivi karibuni)  Lazima iwe installed kama hauna download HAPA
  • Huawei E303 Hi Link Firmware nenda HAPA kudownload
  • Important softwares (Terminal na Universal MasterCode) nenda HAPA kudownload
Note:
Password kwa link zote ni ‘gkiwango’ bila quotes.


KUFANYA MODEM IWEZE KUONYESHA PORTS
Ili kuweza kuiflash modem, inabidi kuifanyia trick ili modem iweze kuonesha ports ambazo inatumia katika pc. Unachotakiwa kufanya tembelea hii link http://192.168.1.1/html/switchProjectMode.html , Utakopovisit hiyo link modem ita disconnect na kuconnect tena, na PORTS zitakuwa ENABLED.
Sasa PC ita detect two unknown devices (Huawei HiLink x2) maana windows inakuwa haifahamu driver za kutumia kwa hizo devices.

windows inakuwa haifahamu driver za kutumia kwa hizo devices.
Hizo device mbili zitakuwa na hardware ID hizi

USB\Vid_12d1&Pid_1442&MI_00
USB\Vid_12d1&Pid_1442&MI_01

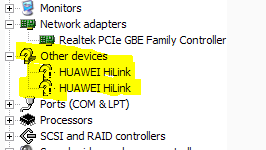
Hizo drivers zinapatikana kwenye
Mobile Partner, sema zinatakiwa kufanyiwa modification kidogo ili ziweze kufanya kazi na Huawei HiLink.
Hii proces inafanywa mara moja, otherwise kama uta unistall Mobile Partner ndo itakubidi urudie tena.
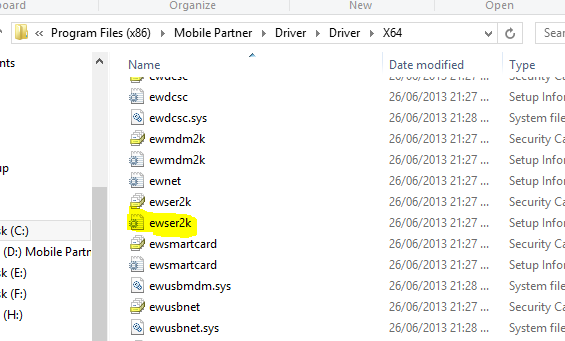
Nenda kwenye Mobile Partner na u-locate hili file “ewser2k.inf”, linapatikana kwenye

C:\Program Files\Mobile Partner\Driver\Driver\X86 kwa 32 Bit au C:\Program Files (x86)\Mobile Partner\Driver\Driver\X64 kwa 64 Bit

Scroll mpaka kwenye [QcomSerialPort...] na uongeze hizi lines

%QcomDevice01% = QportInstall01, USB\VID_12d1&PID_1442&MI_00
%QcomDevice00% = QportInstall00, USB\VID_12d1&PID_1442&MI_01

Hii ni kufanya windows iweze kujua driver zipi za kutumia kwenye zile device zetu. Na sehemu nzuri ya kuweka hizo lines ni katikati ya PID_143E & PID_1448, na itakuwa kama hivi
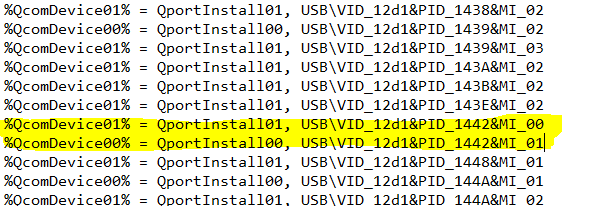

Baada ya hapo sasa rudi kwenye Device Manager na kwa kila device fanya ku-update driver zake, na ubrowse kwenye location ya “ewser2k.inf”. Baada ya hapo device zetu zitaonekana na ports zao ie, 3G PC UI Interface & 3G Application Interface ila hutaweza ku connect na internet.


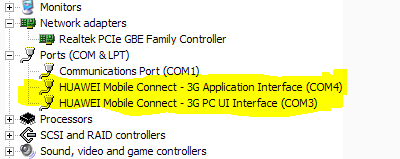
KUFANYA HiLink MODEM I DIAL KAMA MODEM ZA KAWAIDA
Fungua “Terminal” na ufungue port ya 3G PC UI Interface na send hizi AT Commands kwenda kwenye modem……

AT^U2DIAG=119
AT+CFUN=4
AT+CFUN=6
Note:
  • Kama modem Ports zitapotea, nenda kwenye ile link tuliyotumia kule juu      na zitaonekana tena zikiwa na  drivers installed.
  • Hii sehemu si muhimu coz tunaenda kui flash modem so unaweza  kuiruka

FLASHING THE Hi Link MODEM
Kwa vile modem yetu imeshaweza kusoma ports, Inakuwa rahisi kuiflash
Fungua Universal MasterCode na tafuta Flash code(password) kwa kutumia IMEI ya modem yako.
Sasa cha kufanya run Huawei HiLink Firmware kama kawaida tu, na tumia  flash code kama password yako

Subiri imalize hadi iandike SUCCESSFUL

HITIMISHO
Huawei HiLink modem is permanently unlocked na utaweza ku iconnect kwa kutumia normal Huawei dashboard ingawa yenyewe haitakuwa na dashboard sababu pamoja na process zote ulizofanya itabakia kuwa HiLink Modem!!

IMPORTANT
  • Hii method imetumika ku flash modem zaidi ya moja ya Vodacom Tanzania Huawei E303 Hi Link.
  • FEEDBACK ni muhimu.
  • Sitahusika na uharibifu wowote utakaotokea.
Tatizo lolote just COMMENT utasaidiwa.

Login computer without knowing a password

Offline NT Password & Registry Editor-Offline NT Password & Registry Editor works differently than most password recovery programs in that it erases your Windows password instead of recovering it. You can think of it as more of a Windows password reset tool
.
1.  CLICK to download Offline NT Password iso
2.  Then create offline NT password CD
3.   boot your pc and follow the instruction


How to make the Offline NT Password  CD

Unzipped those download file, there should be an ISO image file (cd.iso). This can be burned to CD using whatever burner like ashampoo,nero  etc 
NB: burn as image cd


just enjoy and share with your friends

HOW TO USE TWO WHATSAPP ON SAME PHONE

Whatsapp does not provide official feature to use two account on same phone. But today I am sharing how to use two whatsapp on same phone. This is very easy to do. No technical knowledge needed. There is already an app available on play store you have to just download and install it on your device. Here are some steps given below to use this app. Download link is already given below in this post


STEP 1:
Download & Install 2Lines For Whatsapp from google playstore.


STEP 2:
Open the app to add new account. You can also use this app to switch the accounts.

Use any SIM CARD in any MODEM without unlocking it


Hey Guys, Today we will see how to use Any SIM card in any MODEM without unlocking it.
As you must be knowing that we cannot use any simcard in any modem unless you unlock the modem. but in this article we will see how to use Any SIM in any MODEM without unlocking it.
You will need Nokia PC suite for this Trick.
So Download nokia pc suite from HERE
follow the below steps:
  1. Insert the sim card in the modem which you want to and connect it to your PC.
  2. IT will show you invalid sim, but dont worry just ignore that message and open Nokia PC suite.
  3. You will find connect to internet option in Pc suite, click on it.
  4. Now you have to configure so select configure, select your data card modem and do all operator apn setting which you use in nokia mobile connection.
  5. Finally finish the setup and connect to internet  through PC suite.
  6. Now your net is connected without unlocking.

Remove Write Protection From Flash Disk and Memory Card

Don’t you just hate it when you buy a Pendrive or a Memory card and there’s nothing you can do to it? Whether it comes with software on it, or you’re just trying to use it for any other purpose, you should have the right to change things up however you like.
In this guide, you will be shown how to Remove Write Protection From Pendrive and Memory Card. It’s a fairly simple process, so be sure to follow each and every step carefully. This guide is for information purposes and we are not responsible for anything that may happen to your device in the process.


Before we proceed, what is Write protection exactly? Write Protection is when the manufacturer locks the device down from being written on and prevents unauthorized access to add, change or delete the files on the device. While the uses of write protection is a good thing because it prevent files from being tampered with and the manufacturer can make sure all users are getting the same files, but it’s also very inconvenient. To remove this protection, to you will need to format the drive.
In this guide, I will show you exactly how to do that. Follow each and every step carefully, please. Windows platform is used for the purpose of this guide.

How to Remove Write Protection From Pendrive ?

Step 1: Plug in your pendrive into your USB 2.0 on your computer. In order to make sure the computer has read your pendrive, you can go down to your bottom left on Windows, you will notice a small USB drive icon. If you click that, it will say “Removable Disk.” This means that the pendrive has been read successfully.  You can take a backup of your files from the pendrive or Memory card, Because we here are going to format it Completely.

Step 2: Next we need to open up command prompt. You can do this by simply going to “Start”, then just search for “Command Prompt”, or you can simply just type in “cmd” and command prompt should pop up.

Step 3: In the command prompt, type in the drive letter of your pen drive with a colon at the end, like this: “ F: ” but without the quotation marks.

Step 4: After putting in the previous command, type in “format” without the quotation marks. Here’s how to do it: “format F:” and then press “Enter.”
This should get the process started to remove write protection. Make sure that you are entering the right command with the right drive letter. If you have more than one pen drive plugged in, make sure that you do select the right one as you can accidentally format the wrong drive, causing loss of data.

Step 5: After the process is complete, proceed to closing command prompt.
Congratulations! You’re successfully removed the write protection on your drive.
If you have any questions or concerns, please write them in the comments section below. Let us know how we did and how things went for you.

Change Google Logo with your Name


Hi Freinds Today we will see a nice small but awesome trick To Change Google with your own name or any other name and search.
        As we know When we open www.google.com, it shows Google, But how cool it will be if it shows your Customized name instead of Google.


  Its time to act Cool and Show your Friends about this trick. Its very simple but Effective.

Replacing google with your Name.

Your Can Follow Any of the below sites To change google logo to your name ..

One of my Favourite is Funnylogo


What you have to do is just open the site and Enter the name which you want to display,
Choose the style and Click on Create my Search Engine.

In my case I Entered  ISANGE 
and this is how it looked.


Isn't This cool ?
You can Set It as Your Home page too.


just enjoy and share with your friends