This is default featured slide 1 title

Go to Blogger edit html and find these sentences.Now replace these sentences with your own descriptions.

This is default featured slide 2 title

Go to Blogger edit html and find these sentences.Now replace these sentences with your own descriptions.

This is default featured slide 3 title

Go to Blogger edit html and find these sentences.Now replace these sentences with your own descriptions.

This is default featured slide 4 title

Go to Blogger edit html and find these sentences.Now replace these sentences with your own descriptions.

This is default featured slide 5 title

Go to Blogger edit html and find these sentences.Now replace these sentences with your own descriptions.

Thursday, November 27, 2014

How to Install a PBX Phone System

A small business private branch exchange system gives each of your employees access to multiple phone lines through their desk’s phone. The systems are easy to operate and provide great support, but their installation can be tedious and time-consuming. Many hardware providers offer phone support that may aid the final programming of your PBX platform.
                                PBX installations require running cable to each individual phone.
Step 1Locate an area central to your phone lines and employees; this is where you will mount your key service unit, the brain behind your PBX system; it must be connected to your phone lines and your phone units.
Step 2Attach the KSU to the wall with its mounting kit and your electric screwdriver. You may need to start the mounting holes with an electric drill.
Step 3Plug your circuit cards into the KSU. These are often used for voicemail and will have dedicated, labeled slots for each card. They are often found on the side of the KSU, although some units will require you to remove its casing for access to the slots.
Step 4Connect your telephone lines directly to the KSU using telephone cords. These are the dial tone lines provided by your phone company.
Step 5Run a telephone line from the KSU to each of your employee’s phone units.
Step 6Plug in the KSU to a wall outlet for power and watch to make sure its system lights all illuminate.
Step 7Turn on all of your employee’s phone lines and watch for the proper light to signal that it has connected with the KSU.
Step 8Use the setup and programming guide provided by your PBX vendor to properly code your unit. These directions vary greatly across models, so follow them explicitly.
Step 9Test your phones by placing and receiving calls once the programming is complete.

Tuesday, November 18, 2014

PC Memory, Processor and Motherboard Diagnostic Flowchart

Warning! You must unplug your ATX power supply from the wall before working inside the case.

 
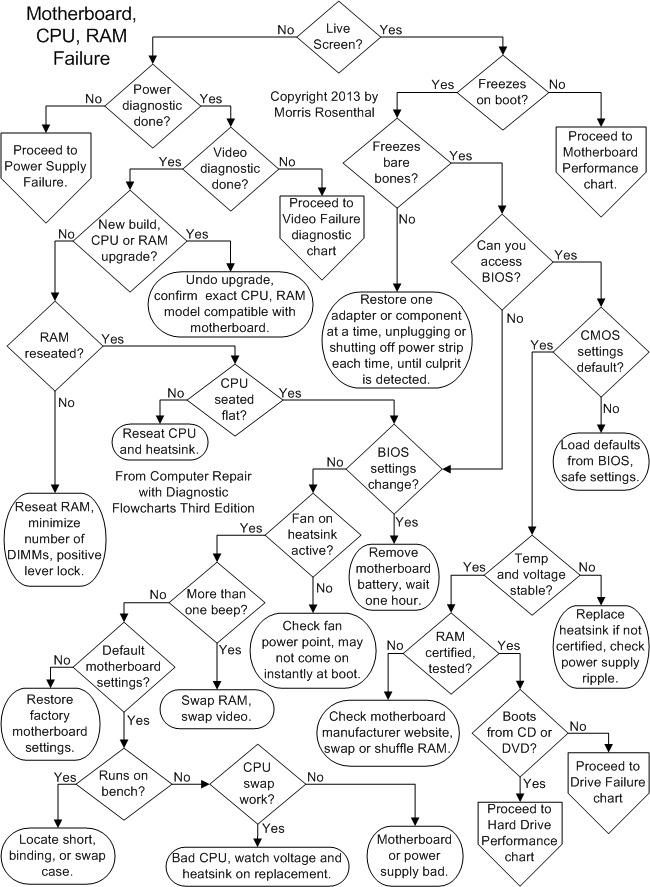
 The troubleshooting flowchart for motherboard, CPU and ram problems along with the explanations below are from my book, "Computer Repair with Diagnostic Flowcharts, Third Edition." The main differences with motherboard troubleshooting over the last five years involve multi-core CPUs, CPUs combined with GPUs on a single chip, and changes in memory technology. Every diamond symbol on the flowchart is linked to text that explains what the abbreviated flowchart messages mean. The book with 17 flowcharts and text is available for purchase here.

Motherboard, CPU and RAM troubleshooting flowchart boot from DVD or USB memory stick RAM certified for motherboard CPU temperature and stability of voltage Use default BIOS settings Can you access CMOS Setup PC locks up bare bones boot freezes when OS starts to load feezes when built on bench without case build motherboard with CPU, RAM and video outside of case check motherboard documentation for hard settings on board PC fails POST with more than one beep CPU is dead Changed the BIOS settings CPU not seated properly RAM not secured in memory slots new build or upgraded perform video failure diagnostics first hear any signs of life from PC anything displayed on LCD monitor is the power supply dead any signs of power from PC BIOS registers all ATA drives motherboard performance chapter hard drive performance chapter

CPU, RAM and Motherboard Troubleshooting

Note that these steps correspond with decision points on the flowchart and are reached directly by clicking on the diamond symbols. The text below cannot be read sequentially.
Does the PC start the boot process and get at least as far as displaying a message from the BIOS or any signs of life from Windows? If all you get is a text message telling you that the monitor can't detect a video signal, it doesn't count, since the monitor can display that message with no computer present.
Return to Diagnostic Chart
Does the system power up? Do you hear any beeps, drives spinning up, fans, etc. If the power isn't coming on, proceed to Power Supply Failure flowchart. The power supply diagnostics will only send you back here if you are getting a definitive sign of life, in the form of a beep.
Return to Diagnostic Chart
If you haven't performed the Video Failure diagnostics for a dead screen yet, do so now, and don't ignore the obvious steps, like checking the power cord and the outlet. You may be tempted to skip forward if you hear beeps, but there's no reason to assume at this point that beeps and the dead screen are the same problem.
Return to Diagnostic Chart
Is this system a new build, or have you just upgraded any components? If you've just upgraded the hardware, power down, unplug the cord and swap the old components back one at a time. Check the motherboard manufacturer website to make sure that the exact CPU and memory modules (brand and specifications) are listed as compatible with the motherboard.
Return to Diagnostic Chart
Of all the issues that can go wrong after you replace the motherboard or upgrade the memory, failure to install the memory modules properly is the most frequently encountered problem. Modern motherboards all use some form of DIMM (Dual Inline Memory Modules). All DIMM sockets are equipped with a locking lever on either end, and these levers must be opened (lowered) before inserting the DIMM, and should rise up and snap closed of their own accord as it seats. It can take quite a bit of force to seat a DIMM properly, but if you don't get it lined up first, you're going to damage the DIMM or the socket.
Depending on the motherboard design and the chipset used, motherboards can combine DIMMs to increase either performance or address space. Older designs used multiple banks to increase speed through interleaving or to "gang" 64 bit wide DIMMs together to create a 128 bit bus for the CPU. Newer "unganged" designs allow multi-core and multi-threading CPUs simultaneous and independent access to DIMMs. The DIMM sockets will be labeled or colored to show matching sockets for populating a bank or a channel, with up to four identical DIMMs required to populate an individual bank in quad channel designs. Further complicating issues is that some motherboard designs can treat multi-sided or multi-ranked DIMMs as if they were multiple DIMMs in the same bank, so see your motherboard documentation. In all cases, the DIMMs should be exactly matched, the same part from the same manufacturer. If different speeds are mixed, some mother-boards will fail to boot, the others will default all memory access to the lowest speed DIMM detected.
Even though DIMM memory is designed to exacting standards, the timing signals are so fussy that memory which has not been tested and approved for a particular motherboard will often fail. The speeds increase and the voltages fall with each new generation (initial releases of DDR4 were specified to operate at 1.20 V dropping to 1.05 V), so don't try to change the BIOS settings based on what you remember from an older PC. Generations of DDR memory are not backwards compatible and motherboards will only support one type. The DDR4 DIMM is up to 284 pins, compared to 240 pins for DDR3 and DDR2, and 184 pins for the original DDR DIMM. If your PC is more than twelve years old, you may have the obsolete RIMM (Rambus Inline Memory Module) memory which required CRIMMs (Continuity RIMMs) in empty slots. I don't remember the last time I saw a SIMM (Single Inline Memory Modules), but they were 16 bit, so 32 bit processors required matched pairs.
Return to Diagnostic Chart
The CPU version of faulty DIMM insertion is both harder to spot and harder to check. While memory modules can be popped in and out in a second, the massive heatsinks on today's high power processors are secured to the motherboard with strong spring clips that aren't designed for frequent operation. As the number of electrical contacts on CPU packages has soared above a thousand, Intel has largely dropped putting the pins on the CPU in favor of putting the pins in the socket, the LGA (Land Grid Array) design. AMD still uses PGA (Pin Grid Array) on some CPU packages, LGA on others.
LGA CPU's are more likely to sit flat and clamp down evenly than the older packages with pins or legs that could easily bind in the socket and hold one side of the CPU package out of contact while seemingly seated. Inspect the edges of the socket with a bright light and a small mirror if possible. If the heatsink obstructs your view completely, you can either remove the heatsink now to check and reseat the CPU, or you can continue troubleshooting, always remembering that you haven't done this test and that you certainly should before spending any money on replacement parts. With the CPU out, always inspect the bottom for discolorations and signs of melting or overheating, and check the socket (LGA) or the CPU (PGA) for bent or crushed pins.
Return to Diagnostic Chart
Did you change the BIOS settings (CMOS Setup) or flash the BIOS (replace it with a newer BIOS version) immediately before the failure occurred? If you were playing with your timing settings for the memory to try to boost performance or clear up a random freeze, or if you were overclocking, odds are your most recent setting is preventing boot. If you can't access the BIOS, the only solution is to clear the settings so that the BIOS will insert the default values for safe operation on the next power up. See your motherboard manual because there are many different approaches to clearing the settings and the wrong approach could damage your motherboard.
Some motherboards provide a jumper or motherboard button for clearing the nonvolatile memory in a few seconds, though you must unplug the power supply first. Otherwise, you need to locate and remove the motherboard battery, unplug the power supply, and let it stand for a good hour or two to let the battery backed settings dissipate. Some manufacturers will suggest you short across the motherboard terminals for the battery after it's removed. The procedures vary according to whether BIOS settings are stored in battery backed CMOS (the old scheme from which CMOS Setup got its name), in an EEPROM, or integrated in the chipset. If you get desperate, see YouTube for CMOS clearing hacks.
Return to Diagnostic Chart
A stone dead CPU is another reason for a system to fail. All modern CPUs require a heatsink, and these are active heatsinks, with a fan on top. You may encounter a heatsink without a fan in an old mass-manufactured brand-name PC, but those were much less powerful CPUs. Check the action on all motherboard mounted heatsink fans There may be a heatsink fan on the chipset (the Northbridge handles communications between the memory and graphics systems and the CPU so it can run very hot) or a motherboard integrated GPU.
The heatsink fan must be hooked up to the correct power point on the motherboard for the BIOS to monitor its condition and turn it off and on. Depending on the BIOS programming, the CPU fan may not spin up immediately when the system is powered on because the CPU is cold. While CPUs should be able to shut themselves down to prevent thermal self destruction, if you just installed a new CPU and powered the system up with no heatsink at all, it may be too late for the CPU.
If the fan on your active heatsink doesn't spin up, replace it (clean the heatsink and CPU and reapply thermal compound) and hope for the best. Avoid prying when removing the heatsink, twist it back and forth after the retention mechanism is removed to break the adhesion of the thermal compound. If you don't trust the power point on the motherboard, it won't hurt the CPU to run a fan directly from a power supply lead through a "Y" adapter, so it comes on instantly and always stays on. Just make sure that the fan can tolerate the voltage, and realize that if you replace a PWM (Pulse Width Modulation) controlled fan with a full-on constant DC voltage fan, the background noise from the PC will be louder.
Make sure that the geometry of the bottom of the heatsink will bring it in full contact with the exposed CPU die or the top of the CPU package. Apply an approved thermal grease or thermal tape before reinstalling the heatsink. Don't put on too much thermal grease or you'll just make a mess. The thermal media is only there to fill the microscopic gaps between the die surface and the heatsink. Don't improvise your thermal material, go to a computer or electronics store and buy some if it didn't come with the parts you purchased online. Installing heatsinks can be frustrating, but this isn't a "bash away at it" process. You can damage the CPU if you start cracking the heatsink against it in an attempt to get the heatsink to sit right. Be patient, study the mechanical connections, make sure you aren't hitting some poorly placed component on the motherboard and check that your heatsink isn't so oversized it just won't fit on the particular motherboard. Just because a heatsink is certified to work with a CPU doesn't mean it's certified to fit on a particular motherboard design.
Return to Diagnostic Chart
Do you hear more than one beep from the system on power up? You should hear a single short beep, not a long, continual beep that can mean that the required auxiliary power isn't connected to a video adapter. Note that very old PCs used the case speaker, rather than an onboard piezoelectric for beep codes, so you won't hear anything unless the case speaker is attached to the four pin speaker block (the outside two pins were used) on the motherboard.
If you hear an unending string of beeps, it's often bad RAM (or a stuck key on the keyboard after boot), while a repeated sequence can be RAM or video. Other beep codes have been largely abandoned since they pertained to what are non-user replaceable surface mount components today. Beeps or no beeps, I always reseat the video adapter and the RAM, paying special attention to the locking levers on the memory sockets.
If you have more than one DIMM installed on a motherboard that only requires one DIMM to boot, try swapping your RAM through the first slot, one DIMM at a time. Read up on your motherboard's use of ganged and unganged, single or double-sided DIMMs (which no longer literally means chips on both sides) and alternating banks to determine the permissible arrangements. It's also a good time to try known good working RAM from another PC that uses the same technology if you have access to some. If the RAM currently installed doesn't meet the motherboard manufacturer specs or isn't on their approved list, it's suspect, even if it worked in the past. Improperly selected RAM can be the cause of problems ranging from no-boot to intermittent lock-ups.
You can try to clean the DIMM slots with a soft cloth or a can of compressed air, just make sure you aren't leaving threads, hairs or dust in the slot when you are done, because it doesn't take a lot of insulation to break a contact. While you'll rarely see this today, if a PC uses tinned (silver color) contacts against gold contacts, the dissimilar metals can cause corrosion over time due to a constant electrical current when the power is off.
Return to Diagnostic Chart
Check your motherboard documentation to determine whether there are any jumpers or switch blocks used for operational settings. With the exception of a jumper for clearing CMOS Setup, these are obsolete today (replaced with CMOS Setup settings), but they were still in wide use with early ATX PCs, some of which are still in use today.
Return to Diagnostic Chart
Running the motherboard without a case is a common technique used by technicians to eliminate any weird grounding or unintended shorting issues or mechanical stresses. It also makes it much easier to swap the CPU if that's required. I normally do my bench testing on top of a cardboard box, with a static free bag or foam between the bottom of the motherboard and the cardboard. You don't walk away from a test like this or you might come back to find the box on fire! If your motherboard powers up on the bench with the same power supply that you used in the case, you have a geometry problem. Ideally, you should have a spare power supply for bench testing if you're going to do regular repair and testing work.
Make sure some standoffs aren't higher than others, putting unacceptable stress on the motherboard. Check that every standoff appears under a screw hole. The easiest way to be sure is to count the standoffs, count the screws, and make sure there are no screws leftover after you install the motherboard. There could be a short caused by a misplaced standoff, a loose screw, metal chips from shoddy materials. I've encountered standoff shorts that produce an endless string of beeps like RAM failure, without damaging the motherboard. There's also the possibility that the case geometry is so messed up (out of square or out of level when the cover is forced on) that it's putting an unacceptable mechanical stress on the motherboard, resulting in an open circuit. If you can't find the cause of the problem, don't hesitate to try another case and power supply.
Return to Diagnostic Chart
If you still have a "no power" situation with the motherboard running out of the case, there's always the last refuge of a scoundrel. Swap in a known good CPU, not forgetting to install a good heatsink and to connect the fan, even just for a quick test. I try to keep around some cheaper CPUs for this purpose, just in case the motherboard is a CPU eater. You can usually find very inexpensive CPUs for sale on eBay as "pulls," removed from PCs with other problems, and you should try the lowest speed CPU (lowest cost) of the family that your motherboard supports. It's another good reason to leave all the motherboard settings on the default "Automatic" setting, so you don't have to fool around with them at this stage.
If your old CPU is bad and the heatsink fan is dead, it's a pretty good bet that the dead fan caused the CPU failure. If the heatsink fan is working, determining whether the CPU failure was due to poor heatsink contact, improper motherboard settings (overclocking), or lousy power regulation from the motherboard is a guessing game. If the motherboard is an older make and you have a couple bucks to spare, replace the CPU and the motherboard together. Replacing just the CPU, even if the motherboard tests out OK, is kind of risky and usually tough to justify from a price/performance standpoint unless the system was practically new, say less than a year old.
If you still have no beeps and no video, you're probably looking at a bad motherboard. But unless you have a DVM and the experience to check the live power supply voltages at the motherboard through back-picking the connectors, I would first try swapping the power supply (if you have access to one) just because it's easier. Again, this diagnosis assumes that you went through the Video Failure diagnostics, which would have forced you through the Power Supply Failure diagnostics as well. Get the PC operating with a replacement motherboard and all the identical parts that the old motherboard failed with before you make the trash can decision.
Return to Diagnostic Chart
Does the screen light up and the PC power on, only to freeze when the operating system begins to load? Some of the reasons a PC will freeze at the beginning of the boot process are different from those that cause freezes during normal operations, which we deal with on the motherboard performance flowchart. If you complete this flowchart and don't solve your boot problem, try the motherboard performance flowchart.
Return to Diagnostic Chart
Does the system freeze when you strip it down to the minimum configuration required to start the boot process? This consists of the power supply, motherboard, CPU, the minimum required RAM, and a GPU (this can be an add-in video adapter, a video adapter integrated on the motherboard, or one of the newer CPU/GPU on a single chip solutions). You can also leave the primary hard drive connected for the first try, though powering up without a hard drive should result in a missing boot device error message rather than a frozen BIOS screen on a healthy PC.
If your system failed with a popping noise or a smoky smell before the freeze-up happened, do your best to locate the failed component by visual inspection (and smell) before you reassemble the PC. If the system boots, or at least passes the point of the freeze-up when it's stripped down, you can start replacing the parts one-by-one, always remembering to unplug the power supply or turn off the power strip when replacing motherboard adapters. When the freeze up returns after you replace a part, you've found the culprit, but double check that the issue is with the component and not with the motherboard slot or the power connector by trying the part in another slot or on another power lead.
Return to Diagnostic Chart
Are you able to access the BIOS (CMOS Setup) by pressing the hot key(s)? The most common hot keys are F2 or Del, but there are dozens of possibilities with older PCs, including multiple keys held down simultaneously, including the CTRL and ALT keys. Most BIOS will normally flash the CMOS Setup hotkey(s) as a text message on the screen at the beginning of the boot process, but some major manufacturers suppressed this to discourage owners from altering the settings and creating a tech support headache. You can always find the key combination through a patient Internet search with the brand and model of your PC. If you cannot access the BIOS settings, the diagnostic approach is the same as it would be with a dead screen, and you should review the dead screen steps before proceeding.
Return to Diagnostic Chart
If you aren't using the default CMOS settings, try restoring the factory settings. Even if you don't remember ever changing any advanced settings for the chipset, memory timing or CPU, it's a good idea to just restore the defaults at this point. You can usually restore these from a major CMOS Setup menu item like "Restore Default Settings" or "BIOS Default Settings." The default settings usually put everything on autodetect and use the recommended timing for the RAM. This means if you're overclocking, stop it, at least until you get the system running again. It doesn't matter whether or not overclocking the exact same CPU or RAM in a friend's system worked without a hitch, you're exceeding the manufacturers recommendations so it's a gamble.
Return to Diagnostic Chart
Are the temperature and supply voltages stable? The BIOS monitors CPU temperature and reports various supply voltages, in some cases using these measurements to determine whether to shut down the PC for thermal overload or voltage instability. These settings can usually be viewed through CMOS Setup, and for future reference, you can access them with 3rd party tools from Windows as well. If your CPU supports DTS (an Internet search will tell you), make sure that the temperature you see displayed is based on DTS and not on a thermocouple that may or may not have good thermal contact with the CPU.
The low voltages (less than 3.3 V) are created on by the motherboard using higher voltages from the power supply, so if the power supply output is stable and the memory voltage is wandering around, the fault lies on the motherboard. If the temperature proves to be unstable, see the text associated with the "Fan on heatsink active?" decision point which addresses the issues involved with reinstalling the heatsink.
Return to Diagnostic Chart
Is the brand and model number of the RAM installed in the PC certified and tested to work with the motherboard? The days are gone when you could assume that if the notches in the DIMM matched the keys in the DIMM sockets, the memory would work. The high performance demanded from today's memory requires increasingly exquisite timing that isn't always achieved by adherence to a general specification. Check the motherboard manufacturer website to see if the RAM you are using is explicitly listed as being tested with the motherboard and CPU.
If you have more RAM installed than is required to boot, it's a good idea to shuffle the DIMMs in and out of the PC to see if there was a problem DIMM causing the freeze up once the operating system started loading. And if you have access to RAM that is compatible with your motherboard, even if it's slower than the DIMMs you are using, try swapping it in for the sake of process of elimination.
Return to Diagnostic Chart
Does the system boot from a CD or DVD, or from a bootable memory stick? In order to run this test, you may have to enter CMOS Setup and change the boot order to set the CD, DVD or USB memory stick as the first boot device. Otherwise, the BIOS will continue trying to boot from a corrupted hard drive (if that's the problem) and the system will freeze rather than going on to try booting from other devices.
If the PC boots from an alternative device, the problem is most likely data corruption, either with the hard drive's master boot (MBR) record or with the operating system. You can test whether the hard drive data is still accessible by exiting to the command prompt from a bootable Windows disc, rather than trying to repair the installation or do a fresh Windows install. If you can access some or all of the data, you can add the drive to a bootable PC as a second hard drive and then either burn the data to DVD or copy it to the host hard drive. See the Hard Drive Performance flowchart for possible causes and solutions.
If the system won't boot from a CD or DVD, proceed to the ATA Drive Failure flowchart. Note that older system with the CMOS option to boot from a USB memory device were often finicky about it, so it's safer to use an original operating system disc for the test.
Return to Diagnostic Chart

Illustrated How to Install RAM Memory Replacement DIMM

There are two good reasons for installing RAM in your system, either you want more total RAM installed, or your current module has failed. It's a simple job, providing you purchase a compatible memory module, almost all of which is in DIMM (Dual Inline Memory Module) form these days. The first task if to remove your old RAM and check the labeling, which is the surest way of making sure the replacement RAM will work. Use both thumbs or two fingers to simultaneously depress the while locking levers on the memory slot, and do it slowly so you don't pop the DIMM up into the air. This particular DIMM was PC-133 non-ECC, but most systems currently in use feature DDR (Double Data Rate) RAM at different speeds.
                        
 I'm holding the replacement memory module up over the slot to align the notches with with slots before installing the RAM. The two notches not only orient the module in the proper direction, they serve as keys to prevent you from installing the wrong type of RAM in the motherboard. The notches on DDR-2 and DDR modules are located differently, and the notches also prevent the installation of older RAM modules that require a higher voltage in the slot. You should always handle DIMMs by the edges, and never touch the gold contacts, because the oil from your fingers can degrade the connection. You can see just below the module to the left that the white locking ears of all three slots are wide open.
                        
Now we actually arrive at how to install RAM on the motherboard. We've already aligned the notches in the DIMM with the slot, and we seat the memory module by pressing down firmly with our thumbs on both ends of the module (right). The while locking ears will rise into place of their own accord if the RAM is installed properly. I took a final shot below just to show the replacement DIMM properly installed, and you can see the white locks on have risen into place on the installed RAM module. There's room on this motherboard to install up to three DIMMs, but mixing and matching brands and speeds has never been good practice, which is why I always try to replace all the RAM in a system when I upgrade the capacity. For laptops, see my guide for swapping RAM modules.


Microsoft Windows shortcut keys


Below is a listing of all the major Windows shortcut keys for every version of Microsoft Windows. If you are looking for shortcut keys for specific Windows programs, see our other computer keyboard shortcuts.

General Windows keyboard shortcuts

Alt + Tab
Switch between open applications in all versions of Windows. Reverse the direction by pressing Alt + Shift + Tab at the same time.
Ctrl + Tab
Switches between program groups, tabs, or document windows in applications that support this feature. Reverse the direction by pressing Ctrl + Shift + Tab at the same time.
Alt + double-click
Display the properties of the object you double-click on in Windows 95 and later. For example, doing this on a file would display its properties.
Alt + Print Screen
Create a screen shot only for the active program window in all versions of Windows. For example, if you opened the calculator and did this only the calculator window would be created as a screen shot. If just the Print Screen key is pressed the whole screen will be made into a screen shot.
Ctrl + Alt + Del
Open the Windows option screen for locking computer, switching user, Task Manager, etc. in later versions of Windows. Pressing Ctrl+Alt+Del multiple times will reboot the computer.
Ctrl + Shift + Esc
Immediately bring up the Windows Task Manager in Windows 2000 and later.
Ctrl + Esc
Open the Windows Start menu in most versions of Windows. In Windows 8 this opens the Start screen and in Windows 3.x this would bring up the Task Manager.
Alt + Esc
Switch between open applications on Taskbar in Windows 95 and later.
Alt + Space bar
Drops down the window control menu for the currently open Windows program in Windows 95 and later.
Alt + Enter
Opens properties window of selected icon or program in Windows 95 and later.
Shift + Del
Will delete any file or other object without throwing it into the Recycle Bin in Windows 95 and later.
Hold down the Shift key
When putting in an audio or data CD that uses Autoplay, holding down the Shift key will prevent that CD from playing.

Windows function key shortcuts

Below is a listing of keyboard shortcuts that use the keyboard function keys. See our what are F1 through F12 keys page for a full listing of what function keys do with all other programs.
F1
Activates help for current open application. If you're at the Windows Desktop, this will activate the help for Windows.
F2
Renames a highlighted icon, file, or folder in all versions of Windows.
F3
Starts find or search when at the Windows Desktop in all versions of Windows.
F4
In Windows 95 and later this opens the drive selection or address bar when browsing files in Windows Explorer.
  • Pressing Alt + F4 closes the current open program window without a prompt in all versions of Windows.
  • Pressing Ctrl + F4 closes the open window within the current active window in Microsoft Windows. This only works in programs that support multiple windows or tabs in the same program window.
F6
While in Windows Explorer, this will move the cursor to different Windows Explorer pane or in Windows 7 browse available drives.
F8
Pressing F8 over and over as the computer is booting will start the computer in Safe Mode.
F10
Activates the File menu bar in all versions of Windows.
  • Simulates a right-click on selected item. This is useful if right-click is difficult or impossible using the mouse.

Windows keyboard key shortcuts

Below is a listing of Windows keys that can be used on computers running a Microsoft Windows 95 or later and using a keyboard with a Windows key. In the below list of shortcuts, the Windows key is represented by "WINKEY" and because not all these shortcuts will work in all versions of Windows we've mentioned what versions of Windows support each Windows key shortcut key.
All versions of Windows
WINKEY
Pressing the Windows key alone opens or hides the Windows Start menu. In Windows 8, this opens or hides the Start screen.
WINKEY + F1
Open the Microsoft Windows help and support center.
WINKEY + Pause / Break key
Open the System Properties window.
WINKEY + D
Opens the Desktop to the top of all other windows.
WINKEY + E
Open Microsoft Windows Explorer.
WINKEY + F
Display the Windows Search or Find feature.
WINKEY + Ctrl + F
Display the search for computers window.
WINKEY + L
Lock the computer and switch users if needed (Windows XP and above only).
WINKEY + M
Minimizes all windows.
WINKEY + Shift + M
Undo the minimize done by WINKEY + M and WINKEY + D.
WINKEY + R
Open the run window.
WINKEY + U
Open Utility Manager or the Ease of Access Center.
Windows XP only
Windows 7 and 8 only
Windows 8 only
Windows XP only
WINKEY + Tab
Cycle through open programs through the Taskbar.
Windows 7 and 8 only
WINKEY + 1-0
Pressing the Windows key and any of the top row number keys from 1 to 0 opens the program corresponding to the number of icon on the Taskbar. For example, if the first icon on the Taskbar was Internet Explorer, pressing WINKEY + 1 would open that program or switch to it if already open.
WINKEY + (Plus (+) or Minus (-))
Open Windows Magnifier and zoom in with the plus symbol (+) and zoom out with the minus symbol (-).
  • Press the WINKEY + ESC to close the Magnifier
WINKEY + Home
Minimize all windows except the active window.
WINKEY + P
Change between the monitor and projection display types or how second screen displays computer screen.
WINKEY + T
Set the focus on the Taskbar icons
WINKEY + Left arrow
Shrinks the window to 1/2 screen on the left side for side by side viewing.
WINKEY + Right arrow
Shrinks the window to 1/2 screen on the right side for side by side viewing.
WINKEY + Up arrow
When in the side by side viewing mode, this shortcut takes the screen back to full size.
WINKEY + Down arrow
Minimizes the screen. Also, when in the side by side viewing mode, this shortcut takes the screen back to a minimized size.
Windows 8 only
WINKEY + ,
Peek at the Windows Desktop.
WINKEY + .
Snap a Windows App to the sides of the screen. Pressing it multiple times will switch between the right and left-hand side of the screen or unsnap the app.
WINKEY + Enter
Open Windows Narrator
WINKEY + C
Open the Charms.
WINKEY + G
Cycle through Desktop gadgets.
WINKEY + H
Open Share in Charms.
WINKEY + I
Open the Settings in Charms.
WINKEY + J
Switch between snapped apps.
WINKEY + K
Open Devices in Charms.
WINKEY + O
Lock the screen orientation.
WINKEY + X
Open the power user menu, which gives you access to many of the features most power users would want to use such as Device Manager, Control Panel, Event Viewer, Command Prompt, and much more.

Additional information

Top 10 keyboard shortcuts everyone should know

100 Keyboard shortcuts (Windows)


Getting familiar with keyboard shortcuts not only help you get the work done faster, but also more efficient. If your daily job rely heavily on using Windows, here are some 100+ Windows Keyboard Shortcuts you might want to check out. If there’s any nifty shortcuts we have missed, appreciate a heads up.

The General Shortcuts

We’ll kickoff the list with some really general shortcuts that you often used.
  • CTRL+C (Copy)
  • CTRL+X (Cut)
  • CTRL+V (Paste)
  • CTRL+Z (Undo)
  • Delete (Delete)
  • Shift+Delete (Delete the selected item permanently without placing the item in the Recycle Bin)
  • CTRL while dragging an item (Copy the selected item)
  • CTRL+Shift while dragging an item (Create a shortcut to the selected item)
  • F2 key (Rename the selected item)
  • CTRL+RIGHT ARROW (Move the insertion point to the beginning of the next word)
  • CTRL+LEFT ARROW (Move the insertion point to the beginning of the previous word)
  • CTRL+DOWN ARROW (Move the insertion point to the beginning of the next paragraph)
  • CTRL+UP ARROW (Move the insertion point to the beginning of the previous paragraph)
  • CTRL+Shift with any of the arrow keys (Highlight a block of text)
  • Shift with any of the arrow keys (Select more than one item in a window or on the desktop, or select text in a document)
  • CTRL+A (Select all)
  • F3 key (Search for a file or a folder)
  • Alt+Enter (View the properties for the selected item)
  • Alt+F4 (Close the active item, or quit the active program)
  • Alt+Enter (Display the properties of the selected object)
  • Alt+Spacebar (Open the shortcut menu for the active window)
  • CTRL+F4 (Close the active document in programs that enable you to have multiple documents open simultaneously)
  • Alt+Tab (Switch between the open items)
  • Alt+ESC (Cycle through items in the order that they had been opened)
  • F6 key (Cycle through the screen elements in a window or on the desktop)
  • F4 key (Display the Address bar list in My Computer or Windows Explorer)
  • Shift+F10 (Display the shortcut menu for the selected item)
  • Alt+Spacebar (Display the System menu for the active window)
  • CTRL+ESC (Display the Start menu)
  • Alt+Underlined letter in a menu name (Display the corresponding menu)
  • Underlined letter in a command name on an open menu (Perform the corresponding command)
  • F10 key (Activate the menu bar in the active program)
  • RIGHT ARROW (Open the next menu to the right, or open a submenu)
  • LEFT ARROW (Open the next menu to the left, or close a submenu)
  • F5 key (Update the active window)
  • Backspace (View the folder one level up in My Computer or Windows Explorer)
  • ESC (Cancel the current task)
  • Shift when you insert a CD-ROM into the CD-ROM drive (Prevent the CD-ROM from automatically playing)

Dialog Box Keyboard Shortcuts

  • CTRL+Tab (Move forward through the tabs)
  • CTRL+Shift+Tab (Move backward through the tabs)
  • Tab (Move forward through the options)
  • Shift+Tab (Move backward through the options)
  • Alt+Underlined letter (Perform the corresponding command or select the corresponding option)
  • Enter (Perform the command for the active option or button)
  • Spacebar (Select or clear the check box if the active option is a check box)
  • Arrow keys (Select a button if the active option is a group of option buttons)
  • F1 key (Display Help)
  • F4 key (Display the items in the active list)
  • Backspace (Open a folder one level up if a folder is selected in the Save As or Open dialog box)

Microsoft Natural Keyboard Shortcuts

  • Win (Display or hide the Start menu)
  • Win+BREAK (Display the System Properties dialog box)
  • Win+D (Display the desktop)
  • Win+M (Minimize all of the windows)
  • Win+Shift+M (Restore the minimized windows)
  • Win+E (Open My Computer)
  • Win+F (Search for a file or a folder)
  • CTRL+Win+F (Search for computers)
  • Win+F1 (Display Windows Help)
  • Win+ L (Lock the keyboard)
  • Win+R (Open the Run dialog box)
  • Win+U (Open Utility Manager)

Accessibility Keyboard Shortcuts

  • Right Shift for eight seconds (Switch FilterKeys either on or off)
  • Left Alt+left Shift+PRINT SCREEN (Switch High Contrast either on or off)
  • Left Alt+left Shift+NUM LOCK (Switch the MouseKeys either on or off)
  • Shift five times (Switch the StickyKeys either on or off)
  • NUM LOCK for five seconds (Switch the ToggleKeys either on or off)
  • Win +U (Open Utility Manager)

Windows Explorer Keyboard Shortcuts

  • END (Display the bottom of the active window)
  • HOME (Display the top of the active window)
  • NUM LOCK+* (Display all of the subfolders that are under the selected folder)
  • NUM LOCK++ (Display the contents of the selected folder)
  • NUM LOCK+- (Collapse the selected folder)
  • LEFT ARROW (Collapse the current selection if it is expanded, or select the parent folder)
  • RIGHT ARROW (Display the current selection if it is collapsed, or select the first subfolder)

Shortcut Keys for Character Map

  • After you double-click a character on the grid of characters, you can move through the grid by using the keyboard shortcuts:
  • RIGHT ARROW (Move to the right or to the beginning of the next line)
  • LEFT ARROW (Move to the left or to the end of the previous line)
  • UP ARROW (Move up one row)
  • DOWN ARROW (Move down one row)
  • PAGE UP (Move up one screen at a time)
  • PAGE DOWN (Move down one screen at a time)
  • HOME (Move to the beginning of the line)
  • END (Move to the end of the line)
  • CTRL+HOME (Move to the first character)
  • CTRL+END (Move to the last character)
  • Spacebar (Switch between Enlarged and Nor mal mode when a character is selected)

Microsoft Management Console (MMC) Main Window Keyboard Shortcuts

  • CTRL+O (Open a saved console)
  • CTRL+N (Open a new console)
  • CTRL+S (Save the open console)
  • CTRL+M (Add or remove a console item)
  • CTRL+W (Close window/tab)
  • F5 key (Update the content of all console windows)
  • Alt+Spacebar (Display the MMC window menu)
  • Alt+F4 (Close the console)
  • Alt+A (Display the Action menu)
  • Alt+V (Display the View menu)
  • Alt+F (Display the File menu)
  • Alt+O (Display the Favorites menu)

MMC Console Window Keyboard Shortcuts

  • CTRL+P (Print the current page or active pane)
  • Alt+- (Display the window menu for the active console window)
  • Shift+F10 (Display the Action shortcut menu for the selected item)
  • F1 key (Open the Help topic, if any, for the selected item)
  • F5 key (Update the content of all console windows)
  • CTRL+F10 (Maximize the active console window)
  • CTRL+F5 (Restore the active console window)
  • Alt+Enter (Display the Properties dialog box, if any, for the selected item)
  • F2 key (Rename the selected item)
  • CTRL+F4 (Close the active console window. When a console has only one console window, this shortcut closes the console)

Remote Desktop Connection Navigation

  • CTRL+Alt+END (Open the m*cro$oft Windows NT Security dialog box)
  • Alt+PAGE UP (Switch between programs from left to right)
  • Alt+PAGE DOWN (Switch between programs from right to left)
  • Alt+INSERT (Cycle through the programs in most recently used order)
  • Alt+HOME (Display the Start menu)
  • CTRL+Alt+BREAK (Switch the client computer between a window and a full screen)
  • Alt+Delete (Display the Windows menu)
  • CTRL+Alt+- (Place a snapshot of the active window in the client on the Terminal server clipboard and provide the same functionality as pressing PRINT SCREEN on a local computer.)
  • CTRL+Alt++ (Place a snapshot of the entire client window area on the Terminal server clipboard and provide the same functionality as pressing Alt+PRINT SCREEN on a local computer.)

Internet Explorer navigation

  • CTRL+B (Open the Organize Favorites dialog box)
  • CTRL+E (Open the Search bar)
  • CTRL+F (Start the Find utility)
  • CTRL+H (Open the History bar)
  • CTRL+I (Open the Favorites bar)
  • CTRL+L (Open the Open dialog box)
  • CTRL+N (Start another instance of the browser with the same Web address)
  • CTRL+O (Open the Open dialog box, the same as CTRL+L)
  • CTRL+P (Open the Print dialog box)
  • CTRL+R (Update the current Web page)
  • CTRL+W (Close the current window)

Comparison of keyboard shortcuts


Keyboard shortcuts are a common aspect of most modern operating systems and associated software applications. Their use is pervasive enough that some users consider them an essential element of their routine interactions with a computer. Whether used as a matter of personal preference or for adaptive technology, the pervasiveness of common conventions enables the comparison of keyboard shortcuts across different systems. The following sections detail some of these comparisons in widely used operating systems.

General shortcuts

A note regarding KDE's shortcuts is that they can be changed and the below list contains the defaults. Some of the combinations are not true for localized versions of operating systems. For example in a non-English version of Windows, the Edit menu is not always bound to the "E" shortcut. Furthermore, many shortcuts (such as CTRL-Z, ALT-E, etc.) are just common conventions and are not handled by the operating system. Whether such commands are implemented (or not) depends on how an actual application program (such as an editor) is written. Not all applications follow (all of) these conventions.
Action Windows Mac OS KDE / GNOME Emacs Vim
File menu Alt+F, or F10 then F Ctrl+F2, then F (requires full keyboard access active, using System Preferences > Keyboard > Keyboard Shortcuts > Full Keyboard Access > All Controls. Alternatively use Ctrl+F7 to toggle this setting.) Alt+F Meta+`, then f Alt+f (gvim)
Edit menu Alt+E Ctrl+F2, then E Alt+E Meta+`, then e Alt+e (gvim)
View menu Alt+V Ctrl+F2, then V Alt+V

Undo the last operation Ctrl+Z, or Alt+← Backspace Cmd+Z Ctrl+Z Ctrl+x, then u
or Ctrl+/
or Ctrl+_
or Undo
u
Redo the last operation Ctrl+Y, or Shift+Alt+← Backspace Shift+ Cmd+Z Shift+Ctrl+Z, or Ctrl+Y Same as undo, when undo is exhausted, it redoes. Move the cursor after one or more undos, and further undos will be redos. R
Cut the selection and store it in the clipboard Ctrl+X, or Shift+Del Cmd+X Ctrl+X Ctrl+w x or "ax to cut in register "a" or "+x to cut in system clipboard
Copy the selection into the clipboard Ctrl+C, or Ctrl+Ins Cmd+C Ctrl+C Meta+w, or Ctrl+Ins y or "ay or "+y
Paste contents of clipboard at cursor Ctrl+V, or Shift+Ins Cmd+V Ctrl+V Ctrl+y, or Shift+Ins p or "ap to paste the content of the "a" register or "+p to paste the content of the system clipboard
Paste special Ctrl+Alt+V Shift+ Opt+ Cmd+V Ctrl+ Shift+V Meta+y
Select all in focused control or window Ctrl+A Cmd+A Ctrl+A Ctrl+x, then h ggVG, unlikely ever needed as most command take an optional range parameter. % means "all in focused windows" here so e.g. to copy all the text, use :%y
Cycle through installed keyboard languages / input methods Shift+Alt, or Win+Space The latter displays a menu with the currently selected input method highlighted, and debuted in Windows 8. Cmd+Space (not MBR) Configure desired keypress in Keyboard and Mouse Preferences, Keyboard Shortcuts, Select the next source in Input menu.[1] Ctrl+Alt+K via KDE Keyboard Shift+Alt in GNOME Ctrl+\

Navigation

Action Windows Mac OS KDE/GNOME
New browser window with same page as current Ctrl+N (for both explorer.exe and iexplore.exe)
Ctrl+N
New folder Ctrl+ Shift+N Shift+ Cmd+N Ctrl+ Shift+N
Applications menu Win or
Ctrl+Esc

Alt + "n" e.g. for _File_ Alt + F
Lock desktop Win+L[2] Ctrl+ Shift+Eject or MBR Ctrl+ Shift+Pwr (If "Require password after sleep or screen saver" is enabled in "System Preferences — Security & Privacy") Ctrl+Alt+L
Show desktop Win+D or
Win+M (then use Win+ Shift+M to bring back all windows)
F11 Ctrl+Alt+D
Log out user
Shift+ Cmd+Q Ctrl+Alt+Delete
Switch active user Win+L[3]

Task manager Ctrl+ Shift+Esc, Ctrl+Alt+Delete[4] Alt+ Cmd+Esc Ctrl+Esc
Rename object F2 Enter or F2 F2
Open file or program Enter Cmd+O Enter
Switch window (next/previous) Alt+Tab / Shift+Alt+Tab Cmd+Tab / Shift+ Cmd+Tab Alt+Tab / Alt+ Shift+Tab
Switch window without dialog (next/previous) Alt+Esc / Shift+Alt+Esc Only works within single Applications
Cmd+` / Cmd+~
Alt+Esc / Shift+Alt+Esc
Run application Win, enter executable name or
Win+R, enter executable name
Cmd+Space, enter executable name Alt+F2, enter executable name
Search Win, enter executable name or
Win+F
Cmd+Space / Alt+F

Power management

Action Windows Mac OS KDE / GNOME
Place computer into sleep/standby mode Sleep (available on some keyboards, configurable in Control Panel → Power Options → Advanced tab dialog box) Opt+ Cmd+Eject[5] Sleep (available on some keyboards, configurable in Control Panel → Power Options → Advanced tab dialog box)
Shutdown computer Shift+Tab +Tab +Space Ctrl+ Opt+ Cmd+Eject (no confirmation, shutdown is immediate) Ctrl+Alt+ Shift+PageDown (KDE; no confirmation, shutdown is immediate)
Restart computer
Ctrl+ Cmd+Eject[5] (no confirmation, restart is immediate) Ctrl+Alt+ Shift+PageUp (KDE; no confirmation, restart is immediate)
Place display in sleep mode
Ctrl+ Shift+Eject
Bring up power/sleep dialog box Alt+F4 (while on Desktop only) Ctrl+Eject

Screenshots

Action Windows Mac OS KDE / GNOME
Save screenshot of entire screen as file Win+Print Screen or Print Screen Shift+ Cmd+3 Print Screen set the name and click "Save". GNOME Shell [6]
Copy screenshot of entire screen to clipboard Print Screen or Ctrl+Print Screen Ctrl+ Shift+ Cmd+3 Print Screen click "Copy to Clipboard". GNOME Shell [6]
Save screenshot of window as file
Shift+ Cmd+4 then Space Alt+Print Screen set the name and click "Save". GNOME [6]
Copy screenshot of window to clipboard Alt+Print Screen Ctrl+ Shift+ Cmd+4 then Space Alt+Print Screen click "Copy to Clipboard". GNOME [6]
Copy screenshot of arbitrary area to clipboard
Ctrl+ Shift+ Cmd+4
Save screenshot of arbitrary area as file
Shift+ Cmd+4
Screencasting

Ctrl+ Shift+Alt+R [7] [8]

Text editing

Many of these commands may be combined with Shift to select a region of text.[9]
Action Windows Mac OS KDE / GNOME Emacs Vim
Delete char to the right of cursor Del or Fn+← Backspace Del, or Ctrl+d, or Fn+← Backspace Del Ctrl+d x
Delete word to the right of cursor Ctrl+Del Opt+Del or
Opt+ Fn+← Backspace
Ctrl+Del Meta+e dw (delete space too) or de (keep space)
Delete word to the left of cursor Ctrl+← Backspace Opt+← Backspace Ctrl+← Backspace Ctrl+← Backspace, or Meta+← Backspace dge (delete space too) or db (keep space)
Go to start of line Home, or Fn+ Cmd+ or Ctrl+A Home Ctrl+a, or Home ^ (go to first non-space) or 0 (go to column 0)
Go to end of line End, or Fn+ Cmd+ or Ctrl+E End Ctrl+e, or End $
Go to start of document Ctrl+Home Cmd+ Ctrl+Home Meta+<, or Ctrl+Home gg
Go to end of document Ctrl+End Cmd+ Ctrl+End Meta+>, or Ctrl+End G
Go to previous word Ctrl+ Opt+ Ctrl+ Meta+b, or Ctrl+, or Meta+ b or ge
Go to next word Ctrl+ Opt+ Ctrl+ Meta+f, or Ctrl+, or Meta+ w or e
Go to previous line , or Ctrl+p Ctrl+p, or k or
Go to next line , or Ctrl+n Ctrl+n, or j or
Go to previous line break (paragraph) Ctrl+ Opt+ Ctrl+ (kword or GNOME) Meta+'{', or Control+ {
Go to next line break Ctrl+ Opt+ Ctrl+ (kword or GNOME) Meta+'}', or Control+ }
Move the cursor down the length of the viewport Page Down Fn+ Page Down Ctrl+v, or Page Down Ctrl+f, or Page Down
Move the cursor up the length of the viewport Page Up Fn+ Page Up Meta+v, or Page Up Ctrl+b, or Page Up
Find Ctrl+F Cmd+F Cmd+E (Search with current selection) Ctrl+F Ctrl+K (GNOME; interactive search) Ctrl+s /
Go to next search result F3 Cmd+G Ctrl+G (GNOME) or F3 (KDE)[10] Ctrl+s n
Go to previous search result Shift+F3 Shift+ Cmd+G Shift+Ctrl+G (GNOME) or Shift+F3 (KDE)[10] Ctrl+r N
Search and replace Ctrl+H Cmd+F Ctrl+H (GNOME) or Ctrl+R (KDE) Meta+% %s/fosh/fish/gc[11]
Search with a regular expression


Ctrl+Meta+s All search uses regular expressions.
Search and replace with a regular expression


Ctrl+Meta+%

Text formatting

Action Windows Mac OS KDE / GNOME[12] Emacs Vim
Bold Ctrl+B Cmd+B Ctrl+B

Underline Ctrl+U Cmd+U Ctrl+U

Italic Ctrl+I Cmd+I Ctrl+I

Uppercase / Lowercase Shift+F3 Opt+ Cmd+C Shift+F3 Meta+u for upper, Meta+l for lower, Meta+c for capitalized. gU for upper, gu for lower, ~ to toggle.
Superscript Ctrl+ Shift+= Ctrl+ Cmd++ (Pages and Adobe Applications only?) Ctrl+ Shift+P[13]

Subscript Ctrl+= Ctrl+ Cmd+- (Pages and Adobe Applications only?) Ctrl+ Shift+B[13]

Make selected text larger/smaller Ctrl+ Shift+>/Ctrl+ Shift+<, Ctrl+[/Ctrl+]


Make selected text bulleted or Numbered Items Ctrl+ Shift+L


Insert Linebreak Shift+ Enter Alt+ Enter Shift+ Enter

Browsers / Go menu

Action Windows Mac OS KDE / GNOME
Go to Address Bar Alt+D or Alt+C or F6
depending on language
Cmd+L Ctrl+L or Alt+D or F6
Go to the previous location in history Alt+ or ← Backspace Cmd+[ or Cmd+ Alt+
Go to the next location in history Alt+ or Shift+← Backspace (web browser only) Cmd+] or Cmd+ Alt+
Go up one level in the navigation hierarchy Alt+ (Vista, 7 or 8 only) or ← Backspace (Windows Explorer) Cmd+ Alt+
Go to the starting page defined by the user or application Alt+Home Cmd+Home Ctrl+Home (KDE) / Alt+Home (GNOME)

Web browsers

Action Windows Mac OS KDE / GNOME Emacs-w3m Vimperator
Bookmarks menu Ctrl+B Cmd+B (Firefox) Alt+B v :bmarks
URL Shortcuts (Adds www. + .com) Ctrl+ Enter Cmd+ Enter (Firefox) or
Control+ Enter (Chrome)
Ctrl+ Enter
URL Shortcuts (Adds www. + .org) Ctrl+ Shift+ Enter Shift+ Cmd+ Enter (Firefox) Ctrl+ Shift+ Enter
URL Shortcuts (Adds www. + .net) Shift + Enter Shift + Enter (Firefox) Shift + Enter
Add bookmark for current page Ctrl+D Cmd+D Ctrl+B / Ctrl+D a :bmark
Add bookmark for current link


Meta+a
Manage bookmarks Ctrl+B Cmd+ Opt+B (Chrome/Safari) or
Cmd+ Shift+B (Firefox)
Ctrl+ Shift+R / Ctrl+B
Focus and select Web search bar Ctrl+E Cmd+E (Opera) or
Cmd+K (Firefox) or
Opt+ Cmd+F (Safari)
Ctrl+k
t (open in a new tab) or T (open in current tab)
Focus and select address bar Ctrl+L or F6 or Alt+D Cmd+L Ctrl+L or Alt+D or F6 g s None (?). Use O to alter URL, use y to copy it.
Refresh a webpage F5 or Ctrl+R Cmd+R F5 or Ctrl+R R r
Refresh a webpage ignoring cache Ctrl+ Shift+F5 or Ctrl+ Shift+R Cmd+ Shift+R Ctrl+ Shift+F5 or Ctrl+ Shift+R
R
Open a new window Ctrl+N Cmd+N (Chrome) Ctrl+N
:winopen
Zoom Options (zoom in / zoom out / zoom 100%) Ctrl++ / Ctrl+- / Ctrl+0 Cmd++ / Cmd+- / Cmd+0 Ctrl++ / Ctrl+- / Ctrl+0
zi / zo / zz (text only) or zI / zO / zZ (text and images)

Tab management

Action Windows Mac OS KDE / GNOME Emacs-w3m Vimperator
New tab Ctrl+T Cmd+T Ctrl+ Shift+N or Ctrl+ Shift+T or Ctrl+T Ctrl+c, then Ctrl+t t
Close tab Ctrl+W Cmd+W Ctrl+W Mozilla Firefox [14] & Opera [15] & Chrom{e,ium} [16] & Arora [17] & Epiphany [18] & Midori Ctrl+F4 Mozilla Firefox [14] & Opera [15] & Chrom{e,ium} [16] & Arora [17]
d
Close all tabs but the current one
Cmd+ Opt+t (Safari)
Ctrl+c, then Meta+w
Go to next tab Ctrl+Tab Control+Tab or Cmd+ Shift+ (Safari) Ctrl+PageDown or Ctrl+Tab or Ctrl+. Ctrl+c, then Ctrl+n gt
Go to previous tab Ctrl+ Shift+Tab Shift+Control+Tab or Cmd+ Shift+ (Safari) Ctrl+PageUp or Ctrl+ Shift+Tab or Ctrl+, Ctrl+c, then Ctrl+p gT
Go to tab-n Ctrl+n (Chrome/Firefox/Internet Explorer) Cmd+n (Chrome) Alt+n (Chrome/Firefox) or Ctrl+n '(Chrome)
First tab: g0 Last tab: g$
Open a previously closed tab Ctrl+ Shift+T Cmd+ Shift+T (Firefox/Opera/Chrome) Ctrl+ Shift+T (Firefox/Opera/Chrome)[16][19][20] Ctrl+ Shift+T (Firefox)[19] u
Open a previously closed window Ctrl+ Shift+N (Firefox)


Window management

Action Windows Mac OS KDE GNOME Emacs
Force window mode (Application requires functionality for set action) Alt+ Enter Option+Alt+ Enter or Option+Alt+F or Cmd+F or Cmd+ Option+F


Pop up window menu Alt+Space
Alt+F3 Alt+Space Ctrl+`, then b
Close the focused window Alt+F4 or Ctrl+F4 or Ctrl+W or Alt+Space then C[21] Cmd+W Alt+F4 Alt+F4 Ctrl+x, then k
Restore the focused window to its previous size Alt+Space then R[21]
Alt+F3 then X Alt+F5 Ctrl+x, then r, then j, then letter of the window state register.
Move the focused window Alt+Space then M[21] then Arrow Keys and Enter(to save location)
Alt+Mouse / Alt+F3 then M then Arrow Keys Alt+Mouse / Alt+F7 then Arrow Keys
Resize the focused window Alt+Space then S[21] then Arrow Keys
Alt+F3 then S then Arrow Keys Alt+F8 then Arrow Keys Ctrl+x, then ^ vertically
Hide the focused window
Cmd+H

Meta+x, then bury-buffer RET, then Ret
Hide all except the focused window
Cmd+ Option+H


Lower the focused window Alt+Esc


Minimize the focused window Alt+Space then N,[21] or Win+ (Windows 7 and Vista Home Premium) Cmd+M Alt+F3 then N Alt+F9 Meta+x, then bury-buffer RET, then Ret
Maximize the focused window Alt+Space then X,[21] or Win+ (Windows 7 and Windows 8) Cmd+L Alt+F3 then X Alt+F10 Ctrl+x, then 1
Maximize horizontally

Available, but no default Available, but no default
Maximize vertically Win+ Shift+ (Windows 7 and Windows 8) Available ('Zoom'), but no default Available, but no default Available, but no default
Minimize all Win+M or Win+D Cmd+Alt+M Available, but no default Ctrl+Alt+D
Minimize all non focused windows Win+Home (Windows 7 and Windows 8.1)
Available, but no default

Undo minimize all Shift+ Win+M
Available, but no default Ctrl+Alt+D
Switch fullscreen/normal size F11 Cmd+ Shift+F F11 F11
Show the window in full screen mode, with no border, menubar, toolbar or statusbar
Depends on application, system default: Cmd+CTRL+F Ctrl+ Shift+F Ctrl+F11
Rollup/down window

Available, but no default Alt+F12
Show all open windows Win+Tab F9 or Move mouse pointer to configured hot corner or active screen corner[22][23]
Win works per desktop on Gnome 3+ Ctrl+x, then Ctrl+b
Show all windows of current application
F3 or Move mouse pointer to configured hot corner or active screen corner[22][23]
Ctrl+` Ctrl+x, then Ctrl+b
Show all workspaces
F8 or Move mouse pointer to configured hot corner or active screen corner[22][23]
Win then mouse over the desktop bar on the right edge of the screen
Move window to left/right/up/down workspace Win+/ (Windows 7 and Windows 8)
Available, but no default Ctrl+Alt+ Shift+ / / /
Move window between multiple monitors Win+ Shift+/ (Windows 7 and Windows 8)


Move window to workspace n

Available, but no default

Switch to next/previous workspace list

Available, but no default

Go to workspace n
Ctrl+n Ctrl+Fn

Go to left/right/up/down workspace [24] Ctrl+ / Ctrl+ / Ctrl+ / Ctrl+ (OS X 10.5 to 10.6), Ctrl+ / Ctrl+ (OS X 10.7) Available, but no default Ctrl+Alt+ / / /
Quit application of current window Alt+F4 or Ctrl+F4 varies[25] Cmd+Q[26] Ctrl+Alt+Esc
q
Close dialog Esc Esc


Open/Focus (preview) pinned program on the taskbar Win+(#) where "#" is the position of the program on the Windows Taskbar (Windows 7 and Windows 8.1)


Open new program window of pinned program in Quick Launch Win+(#) where "#" is the position of the program on the Quick Launch toolbar (Windows Vista, 7 and 8.1)


Open new program window of the pinned program on the taskbar (if program is already opened) Win+ Shift+(#) where "#" is the position of the program on the Windows Taskbar (Windows 7 and Windows 8.1)


Focus the first taskbar entry. Pressing again will cycle through them Win+T, you can back and forth. Hold Shift to cycle backwards (Windows 7 and Windows 8.1)


Peek at the desktop Win+Space (Windows 7 only) F11 or Move mouse pointer to configured hot corner or active screen corner[22][23]


Bring gadgets to the front of the Z-order and cycle between gadgets Win+G (Windows Vista,7) or Win+Space (Vista only, no cycling)


External display options (mirror, extend desktop, etc.) Win+P (Windows 7 and Windows 8)


User interface navigation (widgets and controls)

Action Windows Mac OS KDE GNOME
Moves keyboard focus to next/previous control Tab / Shift+Tab With full keyboard access active (System Preferences > Keyboard > Keyboard Shortcuts > Full Keyboard Access > All Controls) Tab / Shift+Tab Tab / Shift+Tab Tab / Shift+Tab Ctrl+Tab / Shift+Ctrl+Tab
Pop up tooltip for currently focused control Shift+F1

Ctrl+F1
Show context-sensitive help for currently focused window or control Shift+F1 Cmd+? Shift+F1 Shift+F1
Give focus to next/previous pane Ctrl+F6 / Alt+F6 Cmd+`
F6 / Shift+F6
Give focus to splitter bar in paned window


F8
Give focus to window's menu bar F10 or Alt Cmd+ Shift+/, then type command name, or
Ctrl+F2 (or Fn+Ctrl+F2 on some keyboards - requires full keyboard access active using System Preferences > Keyboard > Keyboard Shortcuts > Full Keyboard Access > All Controls))
Alt F10
Pop up contextual menu for currently selected objects (aka context menu) Shift+F10 or Menu Varies with laptop / extended keyboard type; enable Mouse keys in Universal Access, then Function+Ctrl+5 or Ctrl+5 (numeric keypad) or Function+Ctrl+i (laptop) Menu Menu or Shift+F10
Toggle selected state of focused checkbox, radio button, or toggle button Space Space Space Space
Activate focused button, menu item etc. Enter Space (also Enter for menu items) Enter Enter
Select/move to first/last item in selected widget

Home / End Home / End
Scroll selected view by one page up/left/down/right
/ (or Fn++Fn+ on some keyboards)
PageUp / Ctrl+PageUp /
PageDown / Ctrl+PageDown
Scroll selected view to top/bottom
or on MacBook Pro Fn + Opt + or on MacBook Pro Fn + Opt +

Switch focus to the next/previous tab within a window Ctrl+Tab Ctrl+Tab / Cmd+`
Ctrl+Tab -> Ctrl+ Shift+Tab <-
Switch focus to the next/previous panel on the desktop


Ctrl+Alt+Tab / Shift+Ctrl+Alt+Tab
Switch focus to the next/previous panel (without dialog)


Ctrl+Alt+Esc / Shift+Ctrl+Alt+Esc

Command line shortcuts

Below is a list of common keyboard shortcuts that are used in a command line environment.
Action Microsoft Windows
(cmd.exe)
Microsoft Windows
(Windows PowerShell)
Unix/Linux/Mac OS X
(bash)
Unix/Linux/Mac OS X
(POSIX shell)
Scroll through History of typed commands / / / or Ctrl+P/Ctrl+N ESC K / ESC J
Signal end-of-file Ctrl+Z
Ctrl+D
Abort current command/typing Ctrl+C Ctrl+C Ctrl+C Ctrl+C
Erase word to the left Ctrl+← Backspace
Ctrl+W
Erase word to the right Ctrl+Delete
Alt+D
Erase line to the left Ctrl+Home Ctrl+Home Ctrl+U
Erase line to the right Ctrl+End Ctrl+End Ctrl+K
Yank/paste previously erased string

Ctrl+Y
Move one word to the left (backward) Ctrl+ Alt+ Alt+B
Move one word to the right (forward) Ctrl+ Alt+ Alt+F
Move to beginning of line Home Home Ctrl+A
or Home

Move to end of line End End Ctrl+E
or End

Reverse search of history F8 F8 Ctrl+R
Stop execution of the current job

Ctrl+Z
Insert the next character typed verbatim

Ctrl+V
Autocomplete command/file name Tab (enabled by default in Windows XP and later) Tab Tab (usually once) Esc (usually twice)
Paste contents of clipboard at cursor

Shift+Ins
Scroll window up Shift+PageUp (may not work in some versions of Windows XP)
Shift+PageUp
Scroll window down Shift+PageDown (may not work in some versions of Windows XP)
Shift+PageDown

Accessibility

  • In Windows, it is possible to disable these shortcuts using the Accessibility or Ease of Access control panel.
  • In GNOME, these shortcuts are possible if Universal Access is enabled.
Action Windows Mac OS KDE GNOME
Utility Manager Win+U


Use keyboard to control cursor (Left Alt+Left Shift+Numlock

[27]
Allow user to press shortcuts one key at a time ( Shift 5 times)

***( Shift 5 times) [28]
Hear beep when -lock key pressed (Numlock for 5 seconds)


Stop/slow repeating characters when key is pressed (Right Shift for 8 seconds)

***( Shift for 8 seconds)[29] [30][31]
Inverse (Reverse Colors) Mode Left Alt+Left Shift+PrtScn Cmd+ Opt+Ctrl+8 Meta+ Shift+i (if enabled)
Inverse (Reverse Colors) Mode (Only current window)

Meta+ Shift+u (if enabled)

See also